Implementing Kubernetes Network Policies with Calico


NetworkPolicies are vital to the security of Kubernetes infrastructure. In Kubernetes, it is of paramount importance to secure the traffic in our kubernetes clusters.
This functionality is implemented by the network plugins and controlled by NetworkPolicies. Kubernetes networking model requires all pods to be able to access all other pods by default. This is called a flat network because it follows an allow-any-any model.
However, to secure infrastructure, it is necessary to have a certain level of network segmentation methods to ensure that only certain pods can talk to each other, and this is where NetworkPolicy comes into the picture.
This article will talk about security in Kubernetes clusters, traffic incoming and outgoing to and from the cluster, traffic within the cluster, and configuration settings to achieve security in Kubernetes.
Background
In this blog post, we will shed some light on achieving Zero Trust Networking in Kubernetes using Calico CNI network policies. Using Calico can greatly enhance networking capabilities in Kubernetes in terms of security, safety, and robustness.
Zero Trust Networking Architecture
Zero trust network architecture is an approach used in network security that is unified by the principle that the network is always assumed to be hostile. It is the direct opposite of segmentation approaches where we focus on separating the world into trusted and untrusted network segments.
What is Container Network Interface (CNI)?
By default, there is no network connectivity in Linux containers (e.g Docker, LXC, LXD, etc). So, we need to set up and manage container networking (e.g container-to-container, container-to-node, node-to-container) separately. It’s painful to reinvent the wheel and do things manually, like setting up container networking. It can introduce all sorts of errors and bugs in our Kubernetes networking architecture. Thus, to cope with these problems, CNIs were introduced.
What is CNI? It is a Cloud Native Computing Foundations (CNCF) project, which consists of specifications and libraries for writing plugins to configure networking (e.g network interfaces) in Linux containers.
There are many CNI plugins that implement the CNI specification. Some of the widely used CNI plugins are Flannel, Calico, WeaveNet and Cilium, etc. These plugins support networking functions such as namespace, isolation, traffic filtering, IP filtering, traffic mirroring, etc.
Networking in Kubernetes
Kubernetes networking takes care of the following properties:
- All containers communicate with each other without a NAT.
- All nodes can communicate with all containers without a NAT.
- The IP address across containers and other resources should be the same.
Kubernetes makes use of the kubenet plugin to take care of networking in Kubernetes clusters. Kubenet implements basic cbr0 using a bridge and host-local CNI plugins. It is a very basic plugin that lacks many features provided by other plugins like Calico, Flannel, etc. To get the most out of Kubernetes networking, we should always consider using feature-rich plugins, so that we can incorporate features like isolation between namespaces, IP filtering, traffic mirroring, etc.
Problems with Kubernetes Networking
The main problem with Kubernetes NetworkPolicies is that they have certain limitations that restrict the true use of networking in Kubernetes.
- We cannot deny traffic, we can only allow it.
- There is no logging for events like debugging and security.
- There is no common gateway for routing traffic.
- Local host traffic cannot be blocked in Kubernetes NetworkPolicies.
- There is no concept of global policies. Policies can be applied to namespaces only.

Project Calico
Calico is an open-source project owned by Tigera that took networking in Kubernetes to a whole new level. It not only provides features like network connectivity between hosts and containers but also provides networking security and administration. Calico is a CNI plugin and it injects calico functionality into the CNI framework. It is one of the most popular and widely used Kubernetes networking CNI plugins. It is very reliable and flexible and supports enterprise-level cluster networking in Kubernetes.
What Made Calico Stand Out?
Scalability
Calico is based on Layer 3 architecture, so it scales smoothly from a single developer laptop to large enterprise deployments. It uses the BGP (Border Gateway Protocol) routing protocol for Layer 3 network configurations so that it can route packets between different hosts.
Debugging
As Calico relies on the IP layer, it is relatively easy to debug with tools, as compared to other CNI plugins.
Supports micro-segmentation
It provides an easy-to-use network interface for administrators and developers to define network policies between various Kubernetes objects. Calico can also integrate with a service mesh known as Istio. Istio combined with calico can be used to interpret and enforce policy for workloads within the cluster, both at the service mesh layer and network infrastructure layer.
Kubernetes Traditional Networkpolicy Features
Here are some of the features that traditional NetworkPolicy has to offer:
- Policies are applicable to the environment.
- Policies can only be applied to pods that are marked with labels.
- Rules can be applied to environments, pods, and subnets
- Rules can have protocols, numerical or named ports.
Calico Extending Traditional Network Policy Features
Here are the features that Calico adds to the traditional NetworkPolicies offered by Kubernetes:
- Policies can be applied to any Kubernetes object i.e pod, container, virtual machine or interface, etc
- Rules defined using calico can have specific actions which are restriction, permission, or logging.
- Rules defined using calico can target ports, different port ranges, protocols, HTTP/ICMP attributes, IPs, subnets, and selectors (for nodes, environments, hosts).
- Traffic flows can be controlled via DNAT (Destination Network Address Translation) settings and policies for traffic forwarding.
How Kubernetes Network Policies Are Configured
While working with Kubernetes, we are provided with the NetworkPolicy API for managing network policies in the cluster. Configuration files can be defined in the form of YAML, which in turn can be applied to a selected namespace. It can also contain rules for limiting access between different microservices.
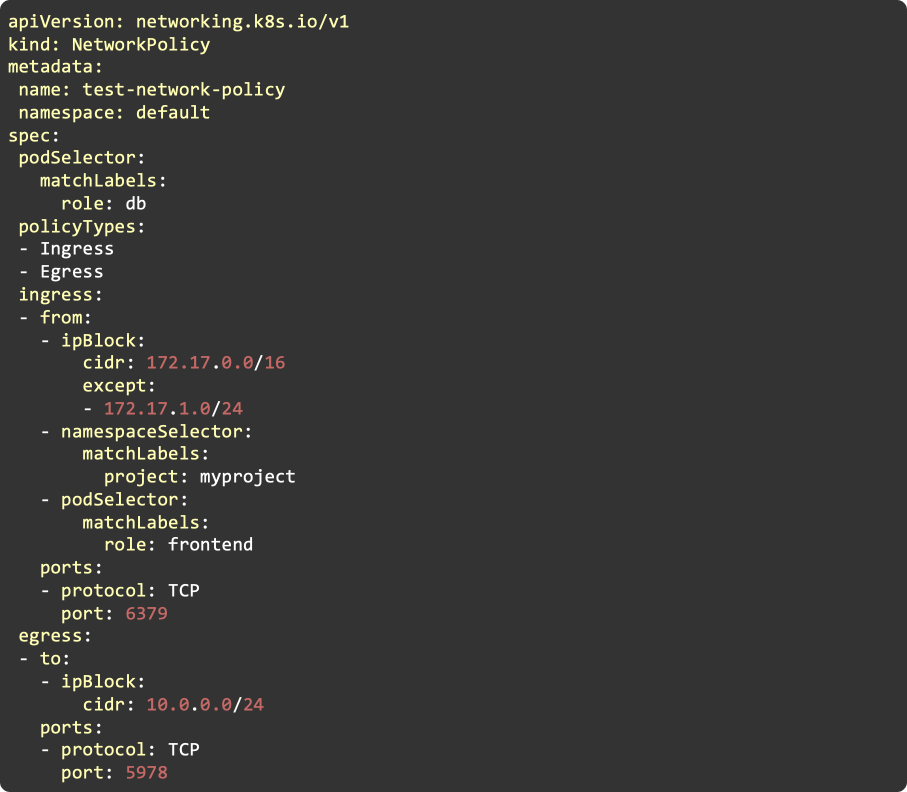
The example above is from the official Kubernetes documentation and will help you understand the logic of network policy operation. Let’s dissect and have an open view of different components from the above configuration file.
As detailed in the file above, we have two types of traffic:
- Incoming to pod (known as Ingress in Kubernetes)
- Outgoing from pod (known as egress in Kubernetes)

Policy is divided into two categories depending on the direction of traffic. Selectors are a crucial part of the configuration file. They can be used to apply defined rules and represent pods or namespaces etc. We can also define broader rules such as “Allow/Deny everything/to all” in different variations.
In the given example, all pods of a namespace are blocked from incoming traffic.

Below is the opposite behavior to the above defined expression.


Hands-on Guide on Using Calico With Kubernetes for Zero Trust Network Architecture
In this section, we will discuss how to achieve Zero Trust Network in the Kubernetes cluster, starting with Calico installation and proceeding to configuration file definitions.
Installing Calico CNI
We will use Minikube in this blog, as it is easy to use, however, the same steps can also be performed on clusters created with kubespray and Kind.
Note: While starting a single node cluster by Minikube we can specify the CNI plugin that we want to use. In our case it will be Calico.

Another way of install Calico on K8s cluster

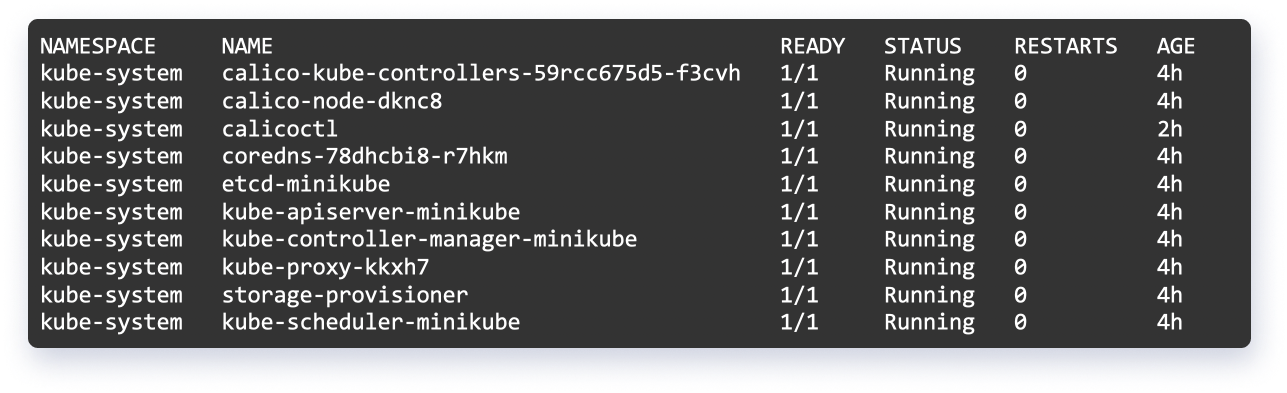
List of Calico Pods

Installing the Calicoctl Tool
Calicoctl tool is a command line tool used to apply Calico features in the cluster. It can be installed using kubectl while working with the Kubernetes cluster. Following is a demonstration of how it can be done.

Using Calicoctl tool

Setting Cluster
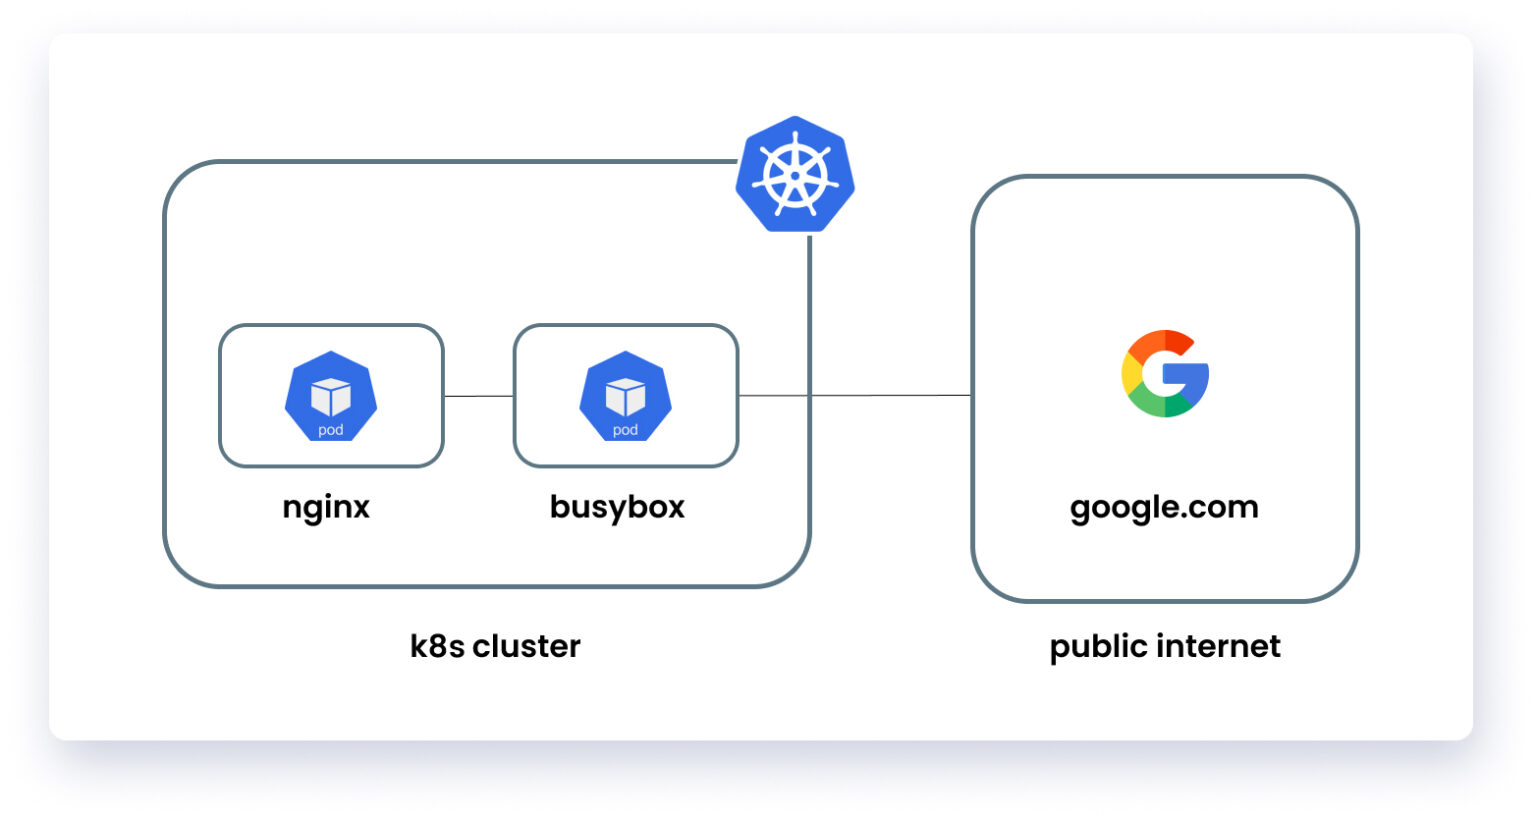
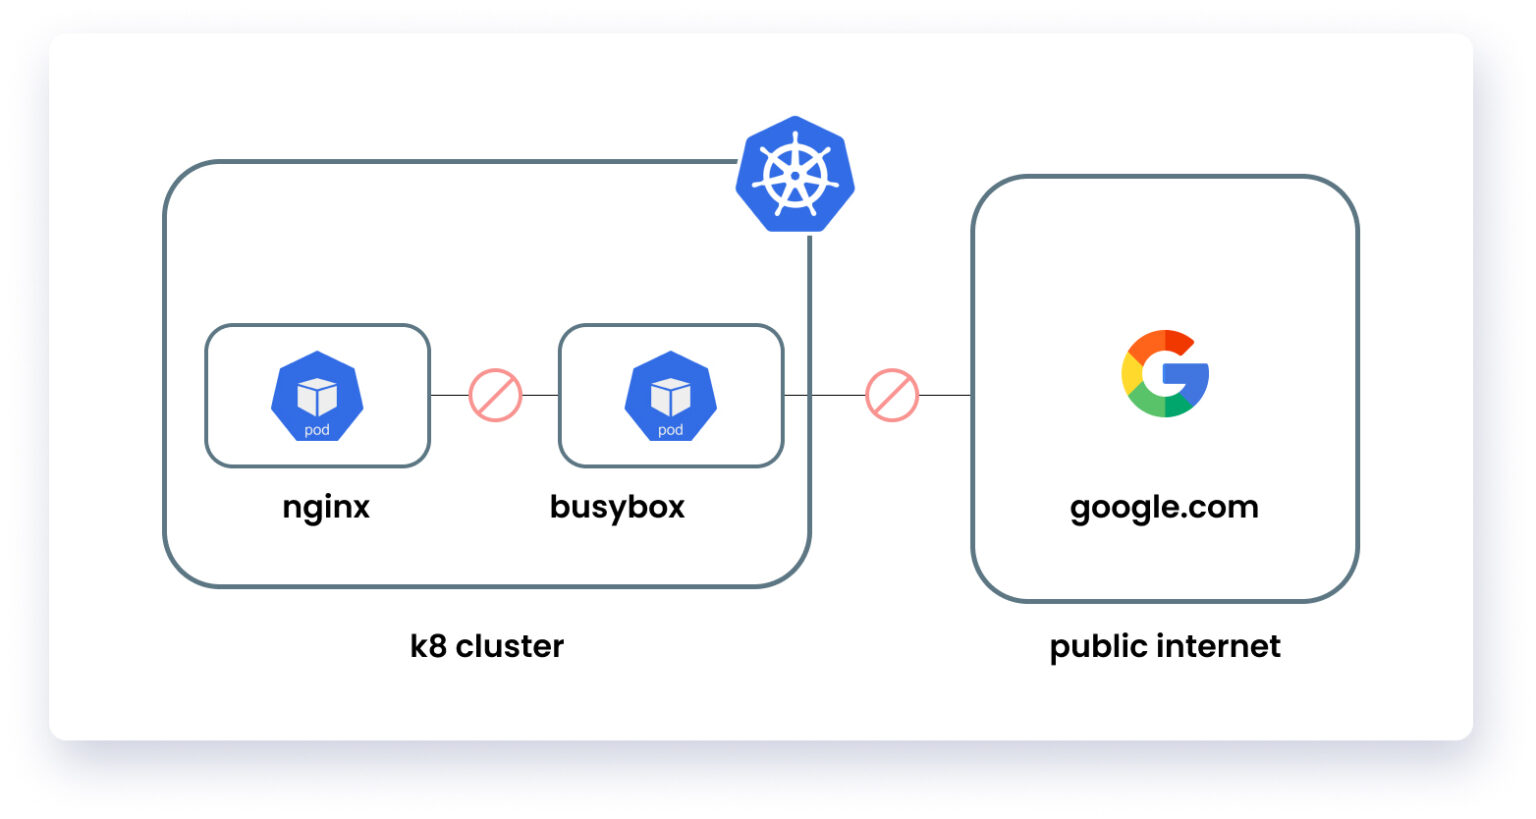
In this blog, we have implemented a simple cluster with two pods (busybox and Nginx), so that we can demonstrate the functionality of Calico. At first, the cluster has two pods, and out of these two pods, the busybox pod can access the Nginx pod and any public domain i.e google.com or any other domain. So, now we will set up network policies so that we can enforce zero trust network architecture. Policies that we will define in this cluster are:
- Deny all traffic in the cluster
- Allow outgoing traffic of busybox pod
- Allow ingress traffic of Nginx pod
Let’s consider deployment for Nginx and busybox has already been done.
Default Network Policy
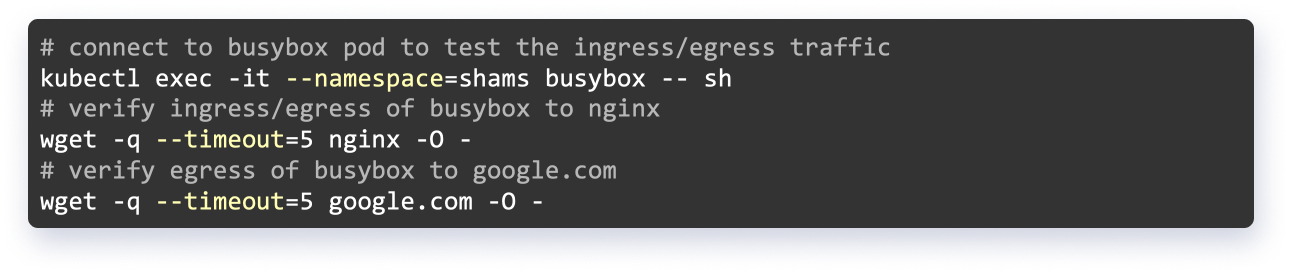
By default, all incoming and outgoing traffic is enabled in the cluster. It can be verified by connecting one pod to another pod or any other domain that is on the internet e.g google.com using wget utility.

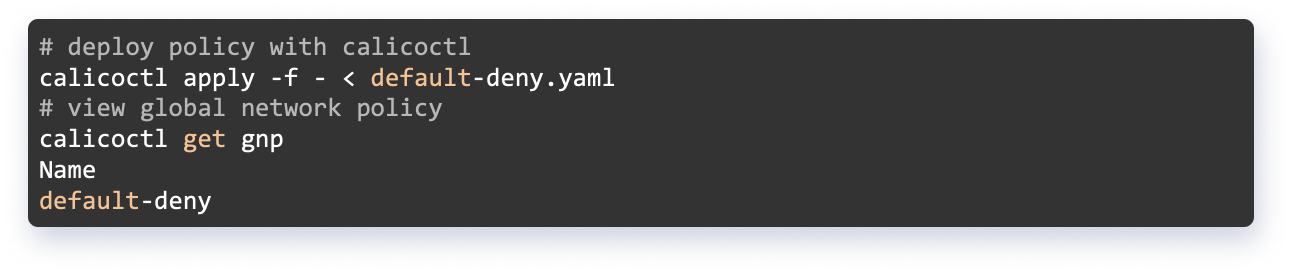
Blocking All Traffic in the Cluster
Now all incoming and outgoing traffic in the cluster is blocked using the default-deny Calico policy. This is a Global Calico Network Policy. A traditional Kubernetes NetworkPolicy cannot implement this policy because it lacks support for it. It can instead be implemented using the Calico CNI plugin.
Why block all traffic in the cluster? Because it will help us adapt Zero Trust Network, to secure cluster workloads. This network policy is not namespace specific and can be applied to all the Kubernetes objects, pod, etc, that match the policy selector. While taking into consideration that default Kubernetes NetworkPolicies are namespaced, all namespaces will need a separate deny policy per namespace to achieve the effect offered by the Calico plugin.
Calico’s Global Network Policy
 Deploying Policy using calicoctl
Allowing Busybox Outgoing Traffic
Now enabling outgoing (egress) traffic of the busybox pod. We can implement a policy for a specific namespace which in my case will be shams.


From the above configurations, the busybox pod can request other pods and domains, etc. however, no other pod or domain can access the busybox pod.
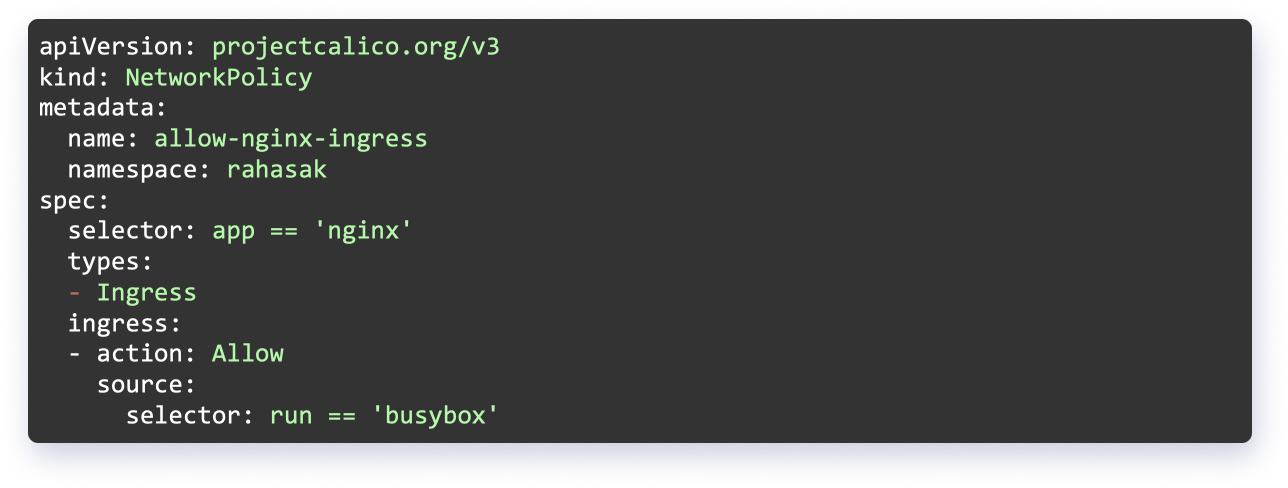
Allowing Nginx Incoming Traffic
Now, we will enable incoming (ingress) traffic to the Nginx pod from a single pod i.e busybox in the cluster. This policy can be enabled globally or to a specific namespace for that matter.

Figure. 8 Allowing ingress traffic for Nginx pod

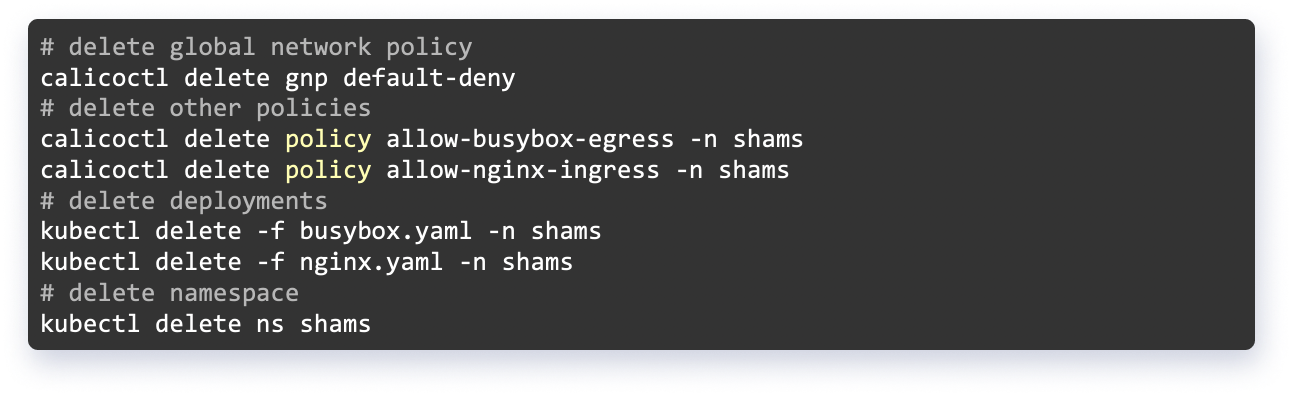
Cleaning up the Calico Infrastructure
The Kubernetes deployments and Calico network policies can be deleted via the following command.
Conclusion
As it is evident, Calico Network Policies offer far more control over Kubernetes clusters and traffic across them than standard Kubernetes. Additionally, if you opt-in for the Enterprise edition you will be able to use the Web UI for managing the rules in a friendly and visual way with access to the logs to see where your traffic is blocked and why.
Calico Enterprise has much more to offer and would make this blog quite long. But one of our favorite features is to set up rules in Draft mode. Draft mode means the rule is in place, logging, reporting, counting hits, etc but it is not enforced. We all know how scary it can be to make changes to production environments. This way you can test the rules first without breaking anything before and get the courage you need to go ahead with the changes.
If you need expert guidance on implementing Calico Network Policies or optimizing your Kubernetes security, our Kubernetes Consulting Services can help you design and implement the best solutions for your cluster.
References
https://www.exoscale.com/syslog/calico-introduction/
https://platform9.com/blog/the-ultimate-guide-to-using-calico-flannel-weave-and-cilium/
https://kubevious.io/blog/post/comparing-kubernetes-container-network-interface-cni-providers
https://docs.projectcalico.org/security/tutorials/calico-policy
https://kmitevski.com/hardening-a-gke-kubernetes-cluster-using-calico-and-network-policies/
https://medium.com/flant-com/calico-for-kubernetes-networking-792b41e19d69
Related Articles
Related Articles
Established in 2012, Xgrid has a history of delivering a wide range of intelligent and secure cloud infrastructure, user interface and user experience solutions. Our strength lies in our team and its ability to deliver end-to-end solutions using cutting edge technologies.
NAVIGATE
Cloud & DevOps Web & Mobile Apps Temporal Digital Marketing GTM Engineering Marketo Consulting HubSpot Consulting Company Careers ResourcesOFFICE ADDRESS
US Address:
Plug and Play Tech Center, 440 N Wolfe Rd, Sunnyvale, CA 94085
Dubai Address:
Dubai Silicon Oasis, DDP, Building A1, Dubai, United Arab Emirates
Pakistan Address:
Xgrid Solutions (Private) Limited, Bldg 96, GCC-11, Civic Center, Gulberg Greens, Islamabad
Xgrid Solutions (Pvt) Ltd, Daftarkhwan (One), Building #254/1, Sector G, Phase 5, DHA, Lahore
Xgrid © 2026. All rights reserved.